
> ## Documentation Index
> Fetch the complete documentation index at: https://dripart-chore-sync-comfy-api-v2-spec-12fd5b4.mintlify.site/llms.txt
> Use this file to discover all available pages before exploring further.

# Qwen-Image ComfyUI原生工作流示例

> Qwen-Image 是一个拥有 20B 参数的 MMDiT（多模态扩散变换器）模型，基于 Apache 2.0 许可证开源。

**Qwen-Image** 是阿里巴巴通义千问团队发布的首个图像生成基础模型，这是一个拥有 20B 参数的 MMDiT（多模态扩散变换器）模型，基于 Apache 2.0 许可证开源。该模型在**复杂文本渲染**和**精确图像编辑**方面取得了显著进展，无论是英语还是中文等多种语言都能实现高保真输出。

**模型亮点**：

* **卓越的多语言文本渲染**：支持英语、中文、韩语、日语等多种语言的高精度文本生成，保持字体细节和布局一致性
* **多样化艺术风格**：从照片级真实到印象派绘画，从动漫美学到极简设计，流畅适应各种创意提示

*相关链接*\*:

* [GitHub](https://github.com/QwenLM/Qwen-Image)
* [Hugging Face](https://huggingface.co/Qwen/Qwen-Image)
* [ModelScope](https://modelscope.cn/models/qwen/Qwen-Image)

另外目前 Qwen-Image 有多种 ControlNet 支持

* [Qwen-Image-DiffSynth-ControlNets/model\_patches](https://huggingface.co/Comfy-Org/Qwen-Image-DiffSynth-ControlNets/tree/main/split_files/model_patches): 包括 canny、depth、inpaint 三个模型
* [qwen\_image\_union\_diffsynth\_lora.safetensors](https://huggingface.co/Comfy-Org/Qwen-Image-DiffSynth-ControlNets/blob/main/split_files/loras/qwen_image_union_diffsynth_lora.safetensors): 图像结构控制lora 支持 canny、depth、pose、lineart、softedge、normal、openpose
* instanX ControlNet: 待更新

## ComfyOrg Qwen-Image live stream

**Qwen-Image in ComfyUI - Lightning & LoRAs**

<iframe className="w-full aspect-video rounded-xl" src="https://www.youtube.com/embed/WBFHwrpYRtY?si=uREGRhBDryTJBIry" title="Qwen-Image in ComfyUI - Lightning & LoRAs / August 15th, 2025" allow="accelerometer; clipboard-write; encrypted-media; gyroscope; picture-in-picture" allowFullScreen />

**Qwen-Image ControlNet in ComfyUI - DiffSynth**

<iframe className="w-full aspect-video rounded-xl" src="https://www.youtube.com/embed/bXMClHfEFn4?si=dcaNdqOMSwvu3t8x" title="Qwen-Image ControlNet in ComfyUI - DiffSynth / August 26th, 2025" allow="accelerometer; clipboard-write; encrypted-media; gyroscope; picture-in-picture" allowFullScreen />

## Qwen-Image 原生工作流示例

<Tip>
  <Tabs>
    <Tab title="本地用户">
      请确保你的 ComfyUI 已经更新。

      * [ComfyUI 下载](https://www.comfy.org/download)
      * [ComfyUI 更新教程](/zh/installation/update_comfyui)

      本指南里的工作流可以在[工作流模板](/zh/interface/features/template)中找到。如果找不到，可能是 ComfyUI 没有更新。

      如果加载工作流时有节点缺失，可能原因有：

      1. 你用的不是最新版（每夜版）。
      2. 启动时有些节点导入失败。
    </Tab>

    <Tab title="云端用户">
      * [Cloud](https://cloud.comfy.org) 会在 ComfyUI 稳定版本发布后更新。

      所以，如果你发现本文档中有任何核心节点缺失，可能是因为新核心节点尚未在最新稳定版中发布。请等待下一个稳定版发布。
    </Tab>
  </Tabs>
</Tip>

<h3 id="image_qwen_image">
  Qwen-Image：文生图
</h3>

使用 Qwen-Image 的 20B MMDiT 模型，以出色的多语言文本渲染和编辑能力生成图像。

<img src="https://raw.githubusercontent.com/Comfy-Org/workflow_templates/main/templates/image_qwen_image-1.webp" alt="Qwen-Image 文生图工作流预览" />

<CardGroup cols={2}>
  <Card title="在 Comfy Cloud 上运行" icon="cloud" href="https://cloud.comfy.org/?template=image_qwen_image&utm_source=docs&utm_medium=referral&utm_campaign=qwen-image">
    在 Comfy Cloud 中打开
  </Card>

  <Card title="下载工作流" icon="download" href="https://github.com/Comfy-Org/workflow_templates/blob/main/templates/image_qwen_image.json">
    下载 JSON，或在模板库中搜索 "Qwen-Image"
  </Card>
</CardGroup>

**示例输出**

![Qwen-Image 示例输出](https://raw.githubusercontent.com/Comfy-Org/workflow_templates/main/output/image_qwen_image.png)

本文档所附工作流中使用了三种不同的模型：

1. Qwen-Image 原始模型 fp8\_e4m3fn
2. 8步加速版：Qwen-Image 原始模型 fp8\_e4m3fn 与 lightx2v 8 步 LoRA
3. 蒸馏版：Qwen-Image 蒸馏模型 fp8\_e4m3fn

**显存使用参考**
GPU: RTX4090D 24GB

| 使用模型                            | 显存占用 | 首次生成  | 第二次生成 |
| ------------------------------- | ---- | ----- | ----- |
| fp8\_e4m3fn                     | 86%  | ≈ 94s | ≈ 71s |
| fp8\_e4m3fn 与 lightx2v 8 步 LoRA | 86%  | ≈ 55s | ≈ 34s |
| 蒸馏版 fp8\_e4m3fn                 | 86%  | ≈ 69s | ≈ 36s |

### 1. 工作流文件

更新 ComfyUI 后，你可以从模板中找到工作流文件，或者将下面的工作流拖入 ComfyUI 中加载。
![Qwen-image 文生图工作流](https://raw.githubusercontent.com/Comfy-Org/example_workflows/main/image/qwen/qwen-image.png)

蒸馏版

<Card title="下载蒸馏版工作流" icon="download" href="https://github.com/Comfy-Org/example_workflows/blob/main/image/qwen/image_qwen_image_distill.json">
  下载 JSON 工作流
</Card>

### 2. 模型下载

**ComfyUI 中可用的模型**

* Qwen-Image\_bf16 (40.9 GB)
* Qwen-Image\_fp8 (20.4 GB)
* 蒸馏版（非官方，仅需 15 步）

全部模型均可在 [Huggingface](https://huggingface.co/Comfy-Org/Qwen-Image_ComfyUI/tree/main) 和 [ModelScope](https://modelscope.cn/models/Comfy-Org/Qwen-Image_ComfyUI/files) 找到

**Diffusion model**

* [qwen\_image\_fp8\_e4m3fn.safetensors](https://huggingface.co/Comfy-Org/Qwen-Image_ComfyUI/blob/main/split_files/diffusion_models/qwen_image_fp8_e4m3fn.safetensors)

Qwen\_image\_distill

* [qwen\_image\_distill\_full\_fp8\_e4m3fn.safetensors](https://huggingface.co/Comfy-Org/Qwen-Image_ComfyUI/blob/main/non_official/diffusion_models/qwen_image_distill_full_fp8_e4m3fn.safetensors)
* [qwen\_image\_distill\_full\_bf16.safetensors](https://huggingface.co/Comfy-Org/Qwen-Image_ComfyUI/blob/main/non_official/diffusion_models/qwen_image_distill_full_bf16.safetensors)

<Note>
  - 蒸馏版的原始作者建议使用 15 步和 cfg 1.0。
  - 根据测试，该蒸馏版在 10 步和 cfg 1.0 下也表现良好。你可以根据想要的图像类型选择 euler 或 res\_multistep。
</Note>

**LoRA**

* [Qwen-Image-Lightning-8steps-V1.0.safetensors](https://huggingface.co/lightx2v/Qwen-Image-Lightning/blob/main/Qwen-Image-Lightning-8steps-V1.0.safetensors)

**文本编码器**

* [qwen\_2.5\_vl\_7b\_fp8\_scaled.safetensors](https://huggingface.co/Comfy-Org/Qwen-Image_ComfyUI/blob/main/split_files/text_encoders/qwen_2.5_vl_7b_fp8_scaled.safetensors)

**VAE**

[qwen\_image\_vae.safetensors](https://huggingface.co/Comfy-Org/Qwen-Image_ComfyUI/blob/main/split_files/vae/qwen_image_vae.safetensors)

**模型保存位置**

```
📂 ComfyUI/
├── 📂 models/
│   ├── 📂 diffusion_models/
│   │   ├── qwen_image_fp8_e4m3fn.safetensors
│   │   └── qwen_image_distill_full_fp8_e4m3fn.safetensors ## 蒸馏版
│   ├── 📂 loras/
│   │   └── Qwen-Image-Lightning-8steps-V1.0.safetensors   ## 8步加速 LoRA 模型
│   ├── 📂 vae/
│   │   └── qwen_image_vae.safetensors
│   └── 📂 text_encoders/
│       └── qwen_2.5_vl_7b_fp8_scaled.safetensors
```

### 3. 工作流使用说明

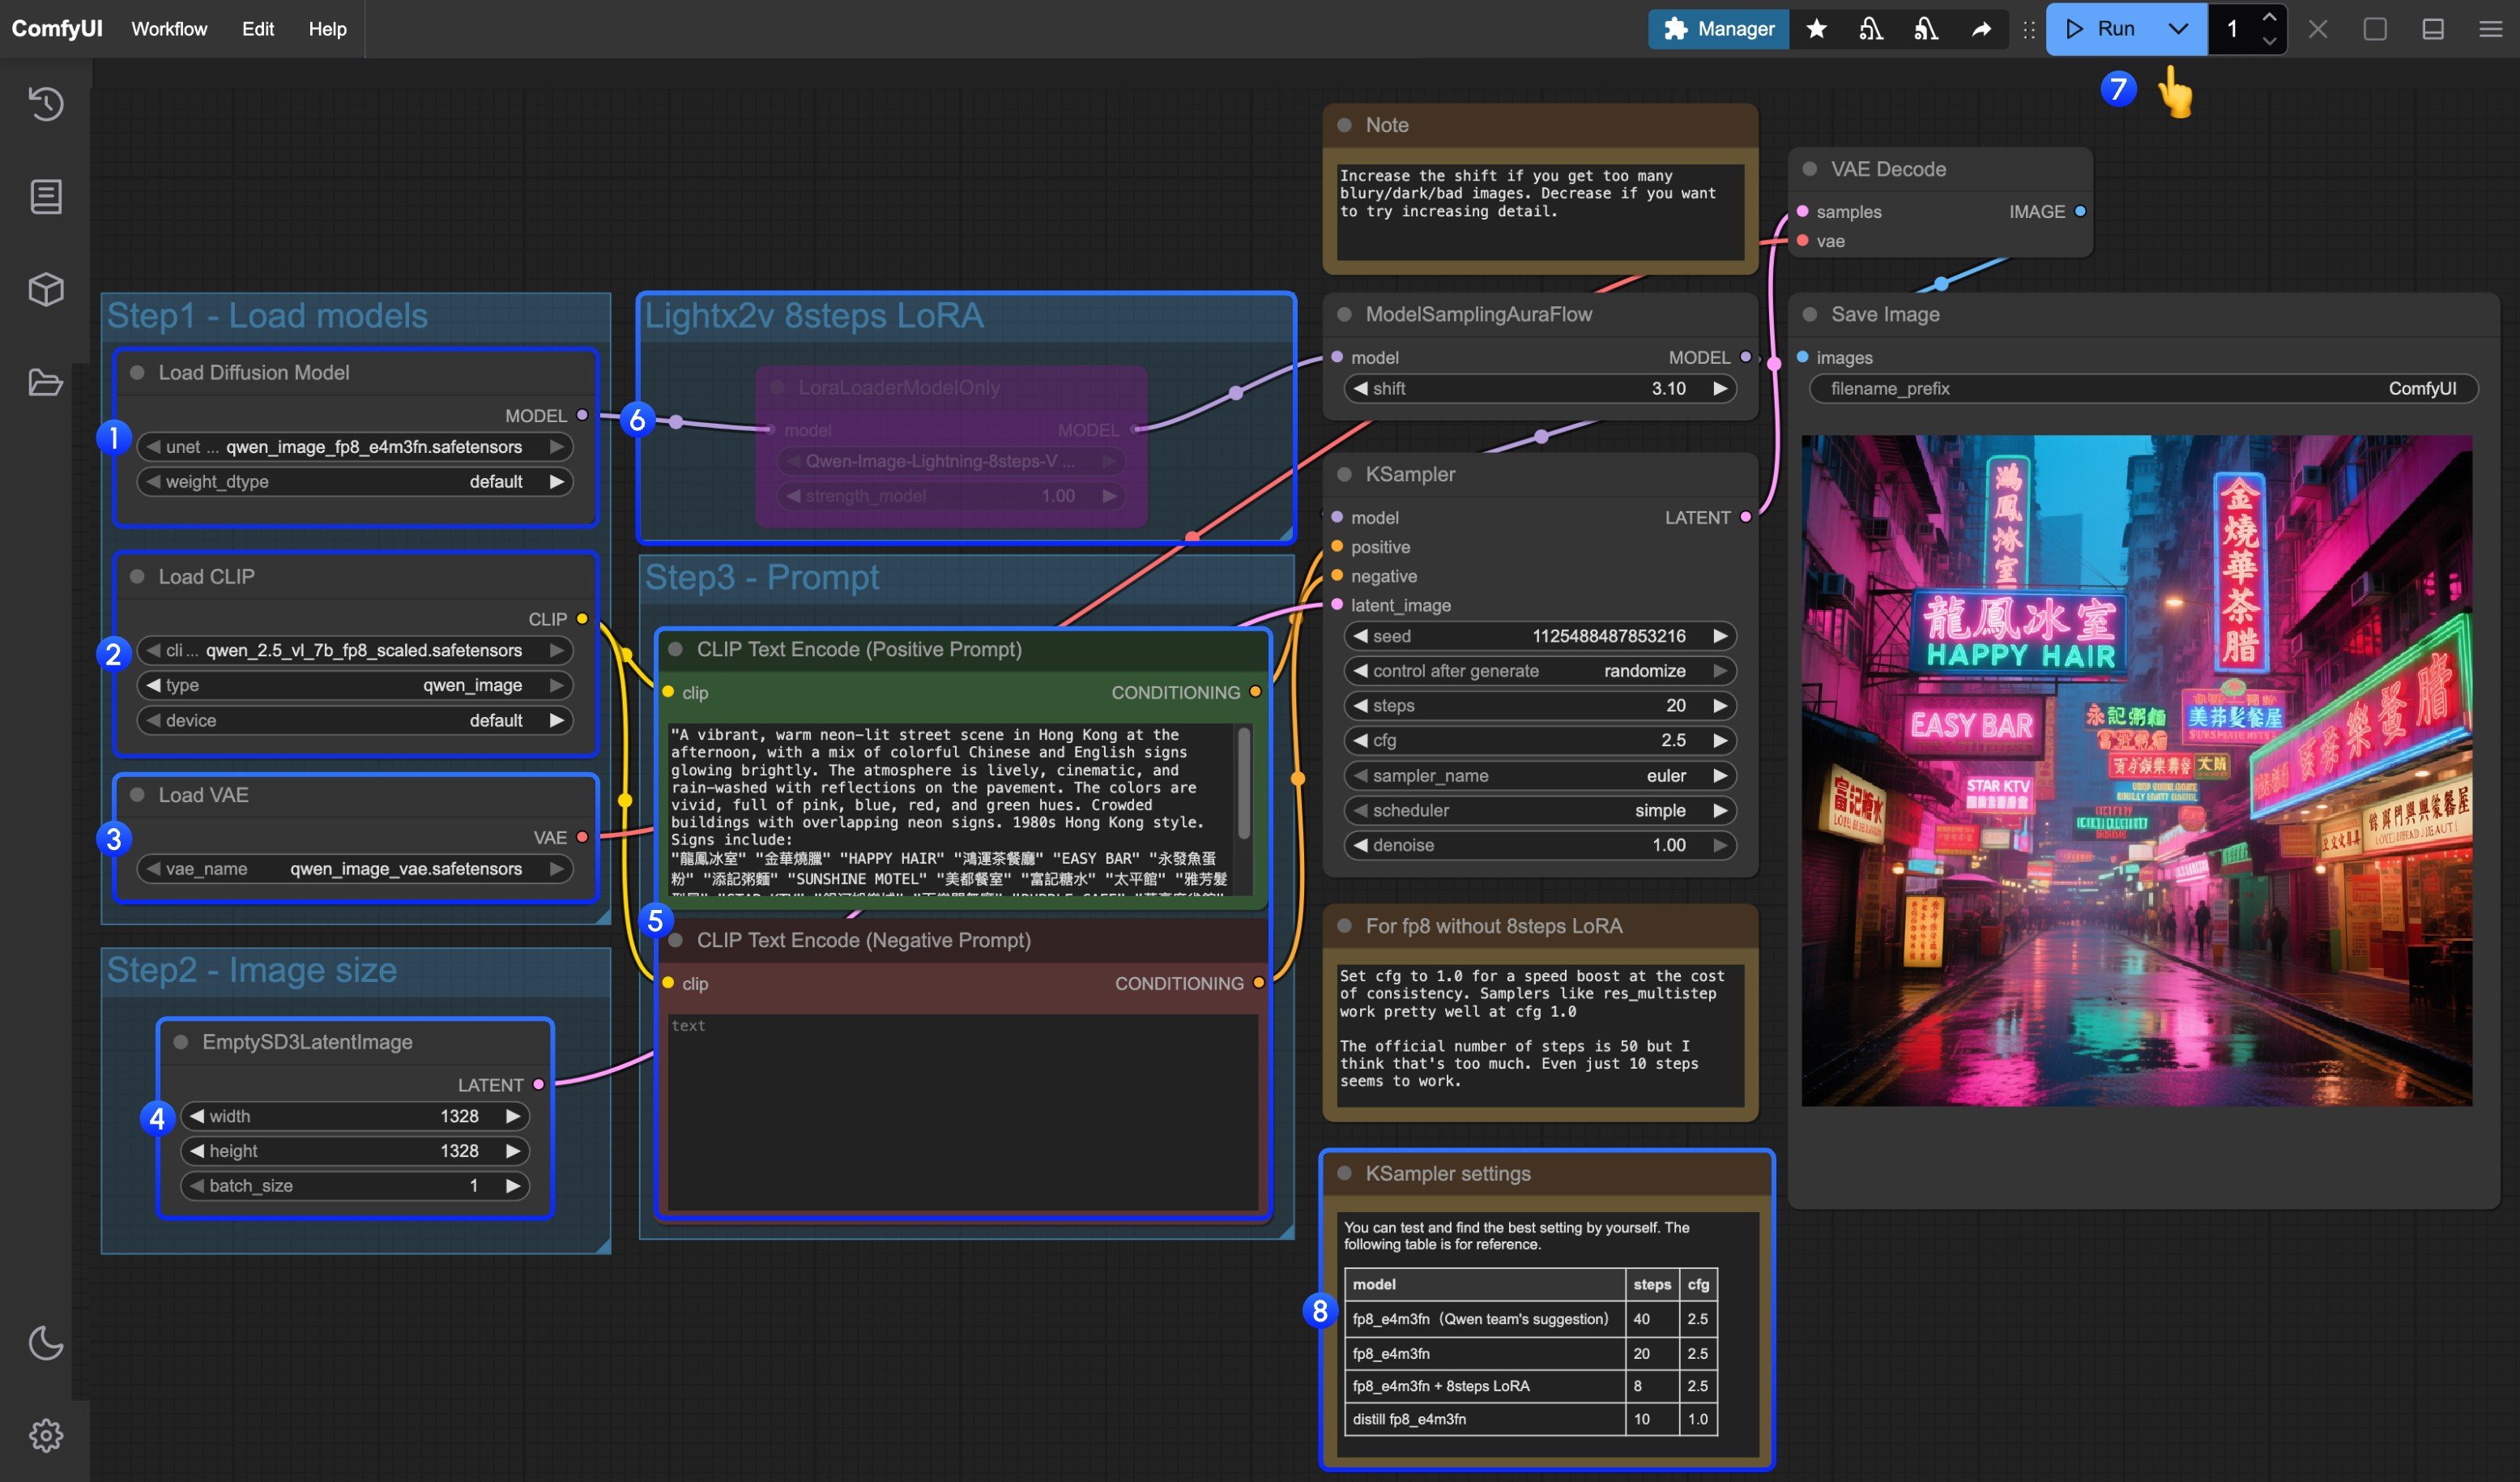
<img src="https://mintcdn.com/dripart-chore-sync-comfy-api-v2-spec-12fd5b4/6Y113JXmzR1RM6A-/images/tutorial/image/qwen/image_qwen_image-guide.jpg?fit=max&auto=format&n=6Y113JXmzR1RM6A-&q=85&s=fa58843c6d2f58e57b7aa9dc316c8deb" alt="步骤图" width="3111" height="1829" data-path="images/tutorial/image/qwen/image_qwen_image-guide.jpg" />

1. 确保 `Load Diffusion Model` 节点已加载 `qwen_image_fp8_e4m3fn.safetensors`
2. 确保 `Load CLIP` 节点已加载 `qwen_2.5_vl_7b_fp8_scaled.safetensors`
3. 确保 `Load VAE` 节点已加载 `qwen_image_vae.safetensors`
4. 确保 `EmptySD3LatentImage` 节点已设置正确的图像尺寸
5. 在 `CLIP Text Encoder` 节点中设置提示词；目前至少支持英语、中文、韩语、日语、意大利语等。
6. 如果要启用 lightx2v 的 8 步加速 LoRA，请选中该节点并使用 `Ctrl + B` 启用，然后按第 8 步中的说明修改 KSampler 设置。
7. 点击 `Queue` 按钮，或使用快捷键 `Ctrl(cmd) + Enter` 运行工作流。
8. 对于不同的模型版本和工作流，请相应调整 KSampler 参数。

<Note>
  蒸馏版模型和 lightx2v 的 8 步加速 LoRA 似乎无法同时使用。你可以尝试不同的组合，以验证它们是否可以一起使用。
</Note>

## Qwen Image InstantX ControlNet 工作流

这是一个 ControlNet 模型，因此你可以像使用普通 ControlNet 一样使用它。

<h3 id="image_qwen_image_instantx_controlnet">
  Qwen-Image InstantX Union ControlNet
</h3>

使用 Qwen-Image InstantX ControlNet 生成图像，支持 Canny、软边缘、深度和姿态。

<img src="https://raw.githubusercontent.com/Comfy-Org/workflow_templates/main/templates/image_qwen_image_instantx_controlnet-1.webp" alt="Qwen-Image InstantX ControlNet 工作流预览" />

<CardGroup cols={2}>
  <Card title="在 Comfy Cloud 上运行" icon="cloud" href="https://cloud.comfy.org/?template=image_qwen_image_instantx_controlnet&utm_source=docs&utm_medium=referral&utm_campaign=qwen-image">
    在 Comfy Cloud 中打开
  </Card>

  <Card title="下载工作流" icon="download" href="https://github.com/Comfy-Org/workflow_templates/blob/main/templates/image_qwen_image_instantx_controlnet.json">
    下载 JSON，或在模板库中搜索"Qwen-Image InstantX ControlNet"
  </Card>
</CardGroup>

**输入素材**

将此文件上传到对应的 `LoadImage` 节点：

<CardGroup cols={2}>
  <Card title="image_qwen_image_instantx_controlnet_input_image.jpg" icon="image" href="https://raw.githubusercontent.com/Comfy-Org/workflow_templates/main/input/image_qwen_image_instantx_controlnet_input_image.jpg">
    `LoadImage` 节点 71 · `image_qwen_image_instantx_controlnet_input_image.jpg`
  </Card>
</CardGroup>

<div style={{display: 'grid', gridTemplateColumns: 'repeat(2, minmax(0, 1fr))', gap: '1rem', alignItems: 'start'}}>
  <img src="https://raw.githubusercontent.com/Comfy-Org/workflow_templates/main/input/image_qwen_image_instantx_controlnet_input_image.jpg" alt="image_qwen_image_instantx_controlnet_input_image.jpg" style={{width: '100%', height: 'auto', objectFit: 'contain'}} />
</div>

## 1. 工作流和输入图像

### 2. 模型链接

1. InstantX ControlNet

下载 [Qwen-Image-InstantX-ControlNet-Union.safetensors](https://huggingface.co/Comfy-Org/Qwen-Image-InstantX-ControlNets/blob/main/split_files/controlnet/Qwen-Image-InstantX-ControlNet-Union.safetensors) 并将其保存到`ComfyUI/models/controlnet/`文件夹中

2. **Lotus Depth模型**

我们将使用该模型来生成图像的深度图。需要下载以下两个模型：

**Diffusion模型**

* [lotus-depth-d-v1-1.safetensors](https://huggingface.co/Comfy-Org/lotus/blob/main/lotus-depth-d-v1-1.safetensors)

**VAE模型**

* [vae-ft-mse-840000-ema-pruned.safetensors](https://huggingface.co/stabilityai/sd-vae-ft-mse-original/blob/main/vae-ft-mse-840000-ema-pruned.safetensors) 或任何SD1.5 VAE

```
ComfyUI/
├── models/
│   ├── diffusion_models/
│   │   └─── lotus-depth-d-v1-1.safetensors
│   └── vae/
│       └──  lvae-ft-mse-840000-ema-pruned.safetensors
```

> 你还可以使用类似 [comfyui\_controlnet\_aux](https://github.com/Fannovel16/comfyui_controlnet_aux) 的自定义节点来生成深度图。

### 3. 工作流说明

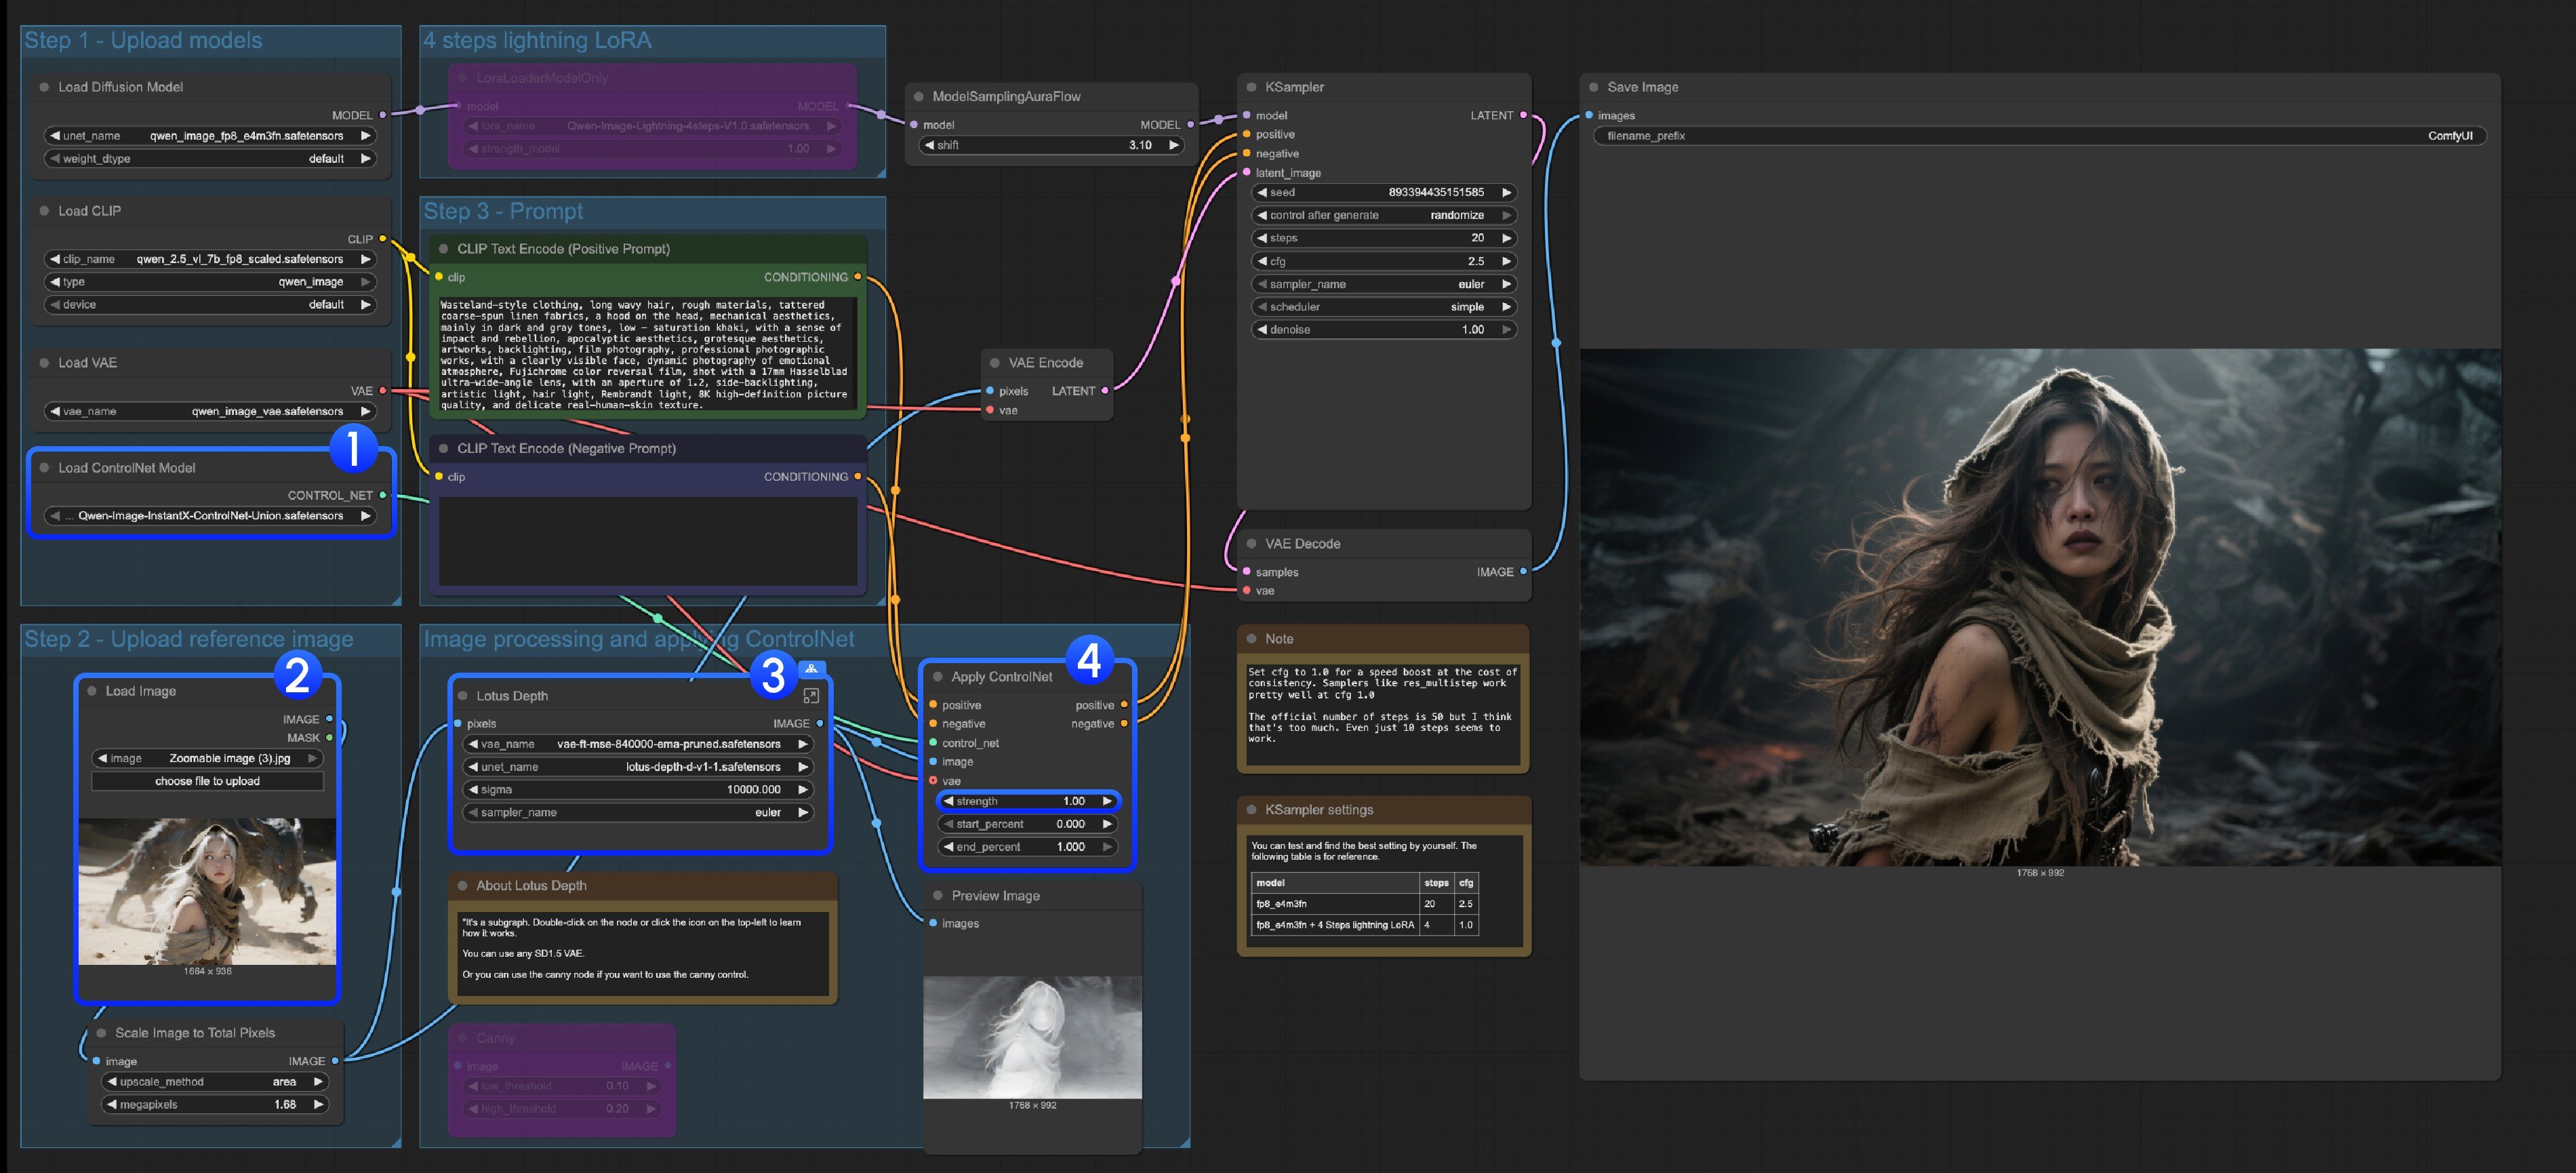
<img src="https://mintcdn.com/dripart-chore-sync-comfy-api-v2-spec-12fd5b4/6Y113JXmzR1RM6A-/images/tutorial/image/qwen/image_qwen_image_instantx_controlnet.jpg?fit=max&auto=format&n=6Y113JXmzR1RM6A-&q=85&s=7f7f009e038945e810e0b22c078de042" alt="流程说明" width="3800" height="1730" data-path="images/tutorial/image/qwen/image_qwen_image_instantx_controlnet.jpg" />

1. 确保`加载ControlNet模型`节点正确加载了`Qwen-Image-InstantX-ControlNet-Union.safetensors`模型
2. 上传输入图像
3. 该子图使用Lotus Depth模型。你可以在模板中找到它，或编辑子图以了解更多信息，确保所有模型都已正确加载
4. 点击`运行`按钮，或使用快捷键`Ctrl(cmd) + Enter`来运行工作流

## Qwen Image ControlNet DiffSynth-ControlNets Model Patches 工作流

<a href="https://cloud.comfy.org/?template=image_qwen_image_controlnet_patch&utm_source=docs" style={{ display: 'inline-block', backgroundColor: '#7c3aed', color: '#ffffff', padding: '10px 20px', borderRadius: '8px', borderColor: "transparent", textDecoration: 'none', fontWeight: 'bold', marginBottom: '1rem'}}>
  在 Comfy Cloud 上运行
</a>

这个模型实际上并不是一个 controlnet，而是一个 Model patch， 支持 canny、depth、inpaint 三种不同的控制模式

原始模型地址：[DiffSynth-Studio/Qwen-Image ControlNet](https://www.modelscope.cn/collections/Qwen-Image-ControlNet-6157b44e89d444)
Comfy Org rehost 地址： [Qwen-Image-DiffSynth-ControlNets/model\_patches](https://huggingface.co/Comfy-Org/Qwen-Image-DiffSynth-ControlNets/tree/main/split_files/model_patches)

### 1. 工作流及输入图片

下载下面的图片拖入 ComfyUI 中以加载对应的工作流
![workflow](https://raw.githubusercontent.com/Comfy-Org/example_workflows/refs/heads/main/image/qwen/qwen-image-controlnet-model-patch/image_qwen_image_controlnet_patch.png)

<a className="prose" target="_blank" href="https://raw.githubusercontent.com/Comfy-Org/workflow_templates/refs/heads/main/templates/image_qwen_image_controlnet_patch.json" style={{ display: 'inline-block', backgroundColor: '#0078D6', color: '#ffffff', padding: '10px 20px', borderRadius: '8px', borderColor: "transparent", textDecoration: 'none', fontWeight: 'bold'}}>
  <p className="prose" style={{ margin: 0, fontSize: "0.8rem" }}>下载 JSON 格式工作流</p>
</a>

下载下面的图片作为输入图片：

![input](https://raw.githubusercontent.com/Comfy-Org/example_workflows/refs/heads/main/image/qwen/qwen-image-controlnet-model-patch/input.png)

### 2. 模型链接

其它模型与 Qwen-Image 基础工作流一致，你只需下载下面的模型并保存到 `ComfyUI/models/model_patches` 文件夹中

* [qwen\_image\_canny\_diffsynth\_controlnet.safetensors](https://huggingface.co/Comfy-Org/Qwen-Image-DiffSynth-ControlNets/resolve/main/split_files/model_patches/qwen_image_canny_diffsynth_controlnet.safetensors)
* [qwen\_image\_depth\_diffsynth\_controlnet.safetensors](https://huggingface.co/Comfy-Org/Qwen-Image-DiffSynth-ControlNets/resolve/main/split_files/model_patches/qwen_image_depth_diffsynth_controlnet.safetensors)
* [qwen\_image\_inpaint\_diffsynth\_controlnet.safetensors](https://huggingface.co/Comfy-Org/Qwen-Image-DiffSynth-ControlNets/resolve/main/split_files/model_patches/qwen_image_inpaint_diffsynth_controlnet.safetensors)

### 3. 工作流使用说明

目前 diffsynth 有三个 patch 的模型： Canny、Detph、Inpaint 三个模型

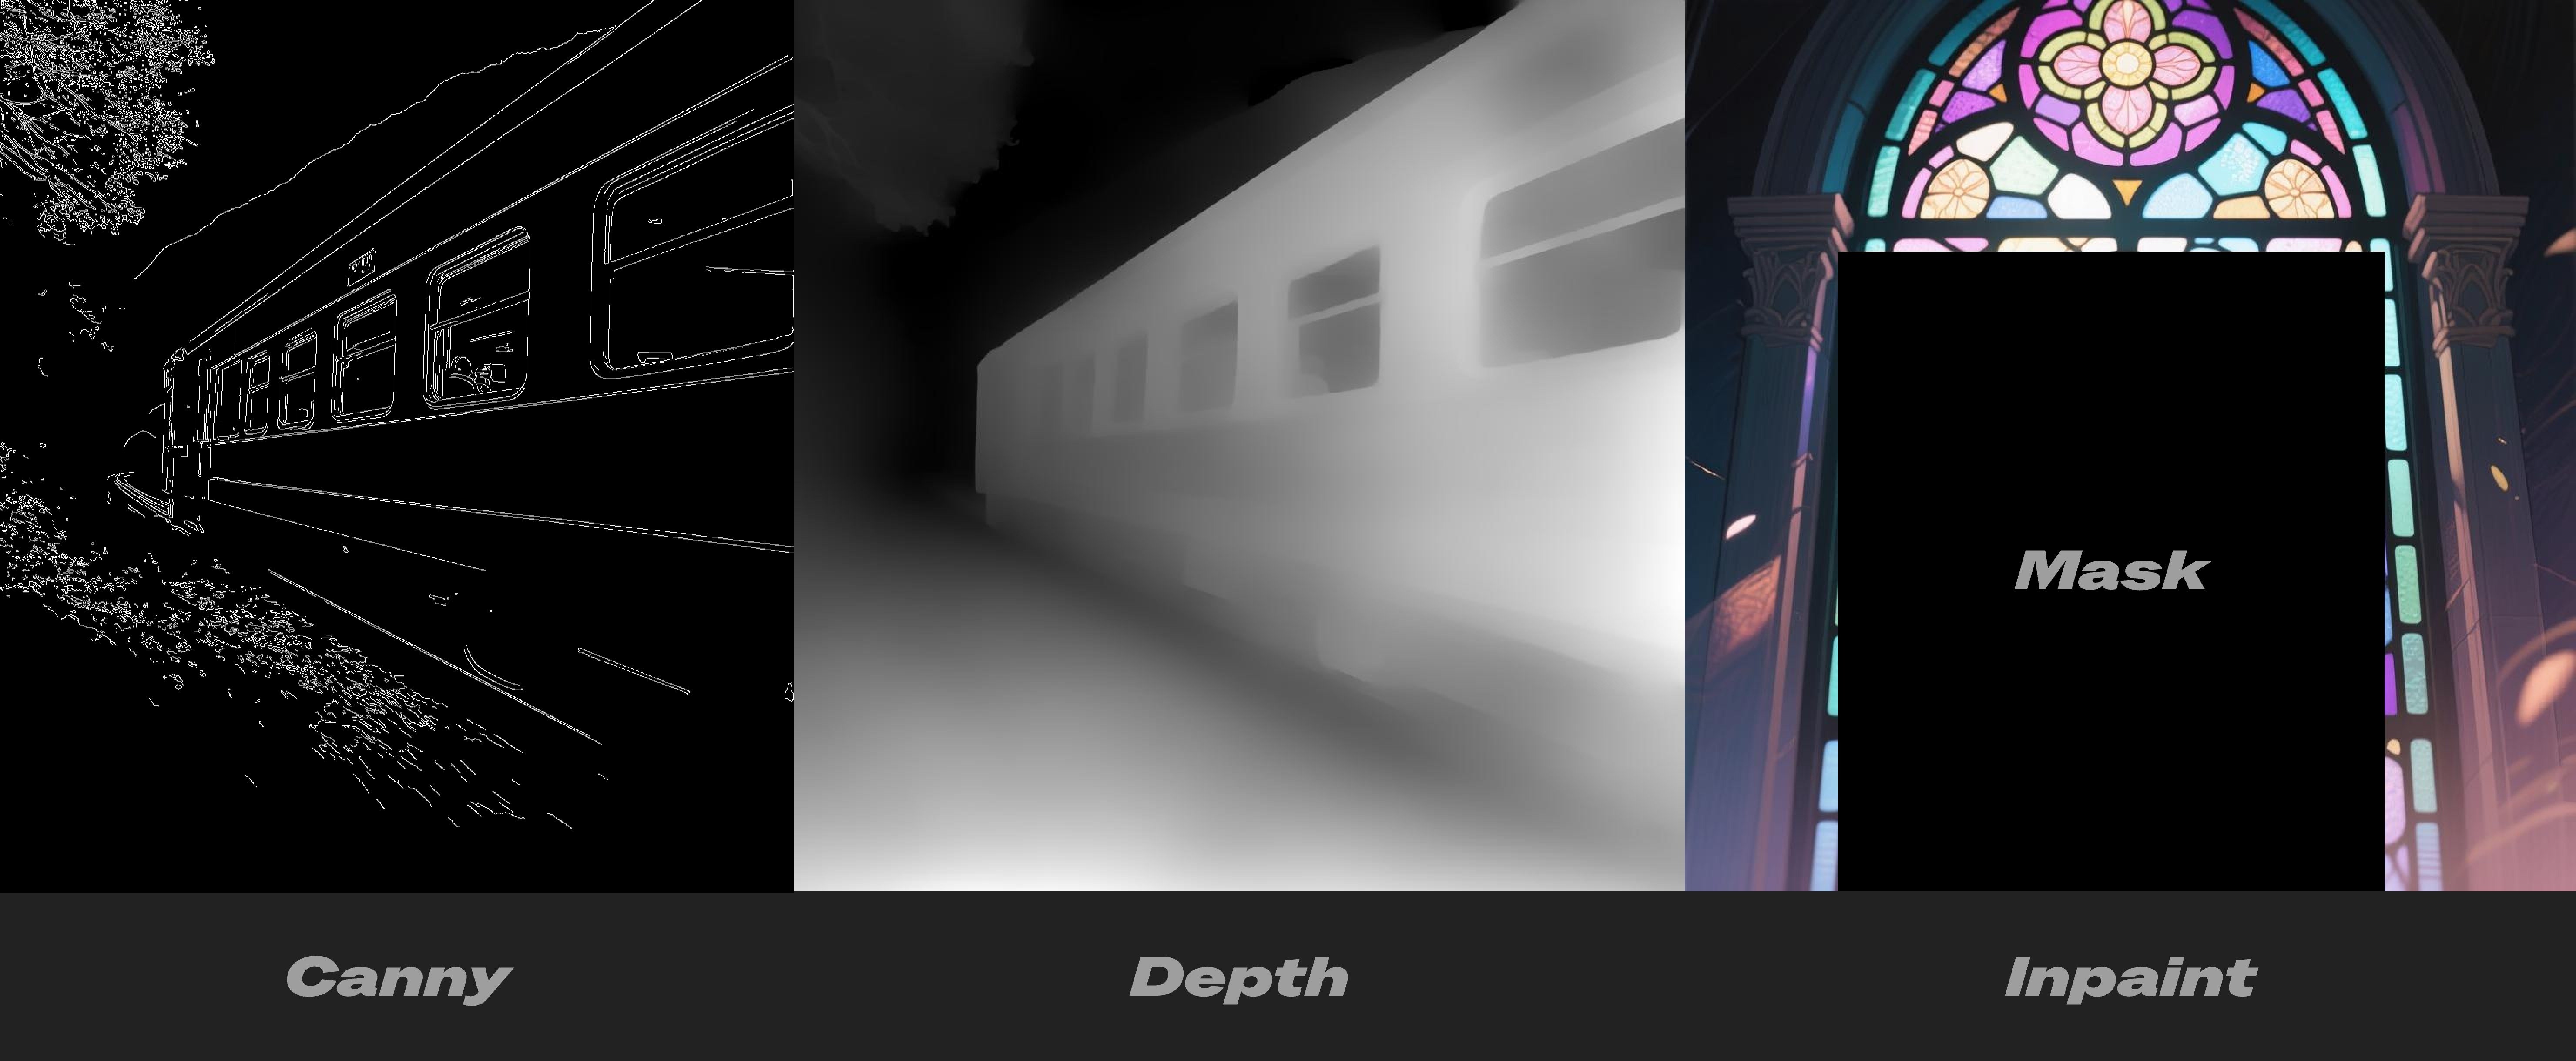
如果你是第一次使用 ControlNet 相关的工作流，你需要了解的是，用于控制的图片需要预处理成受支持的图像才可以被模型使用和识别

<img src="https://mintcdn.com/dripart-chore-sync-comfy-api-v2-spec-12fd5b4/6Y113JXmzR1RM6A-/images/tutorial/image/qwen/controlnet_input_types.jpg?fit=max&auto=format&n=6Y113JXmzR1RM6A-&q=85&s=0e31c50421896c384eb37bb89e66c3f4" alt="输入类型示意" width="5920" height="2438" data-path="images/tutorial/image/qwen/controlnet_input_types.jpg" />

* Canny: 处理后的 canny ， 线稿轮廓
* Detph: 预处理后的深度图，体现空间关系
* Inpaint: 需要用 Mask 标记需要重绘的部分

由于这个 patch 模型分为了三个不同的模型，所以你需要在输入时选择正确的预处理类型来保证图像的正确预处理

**Canny 模型 ControlNet 使用说明**
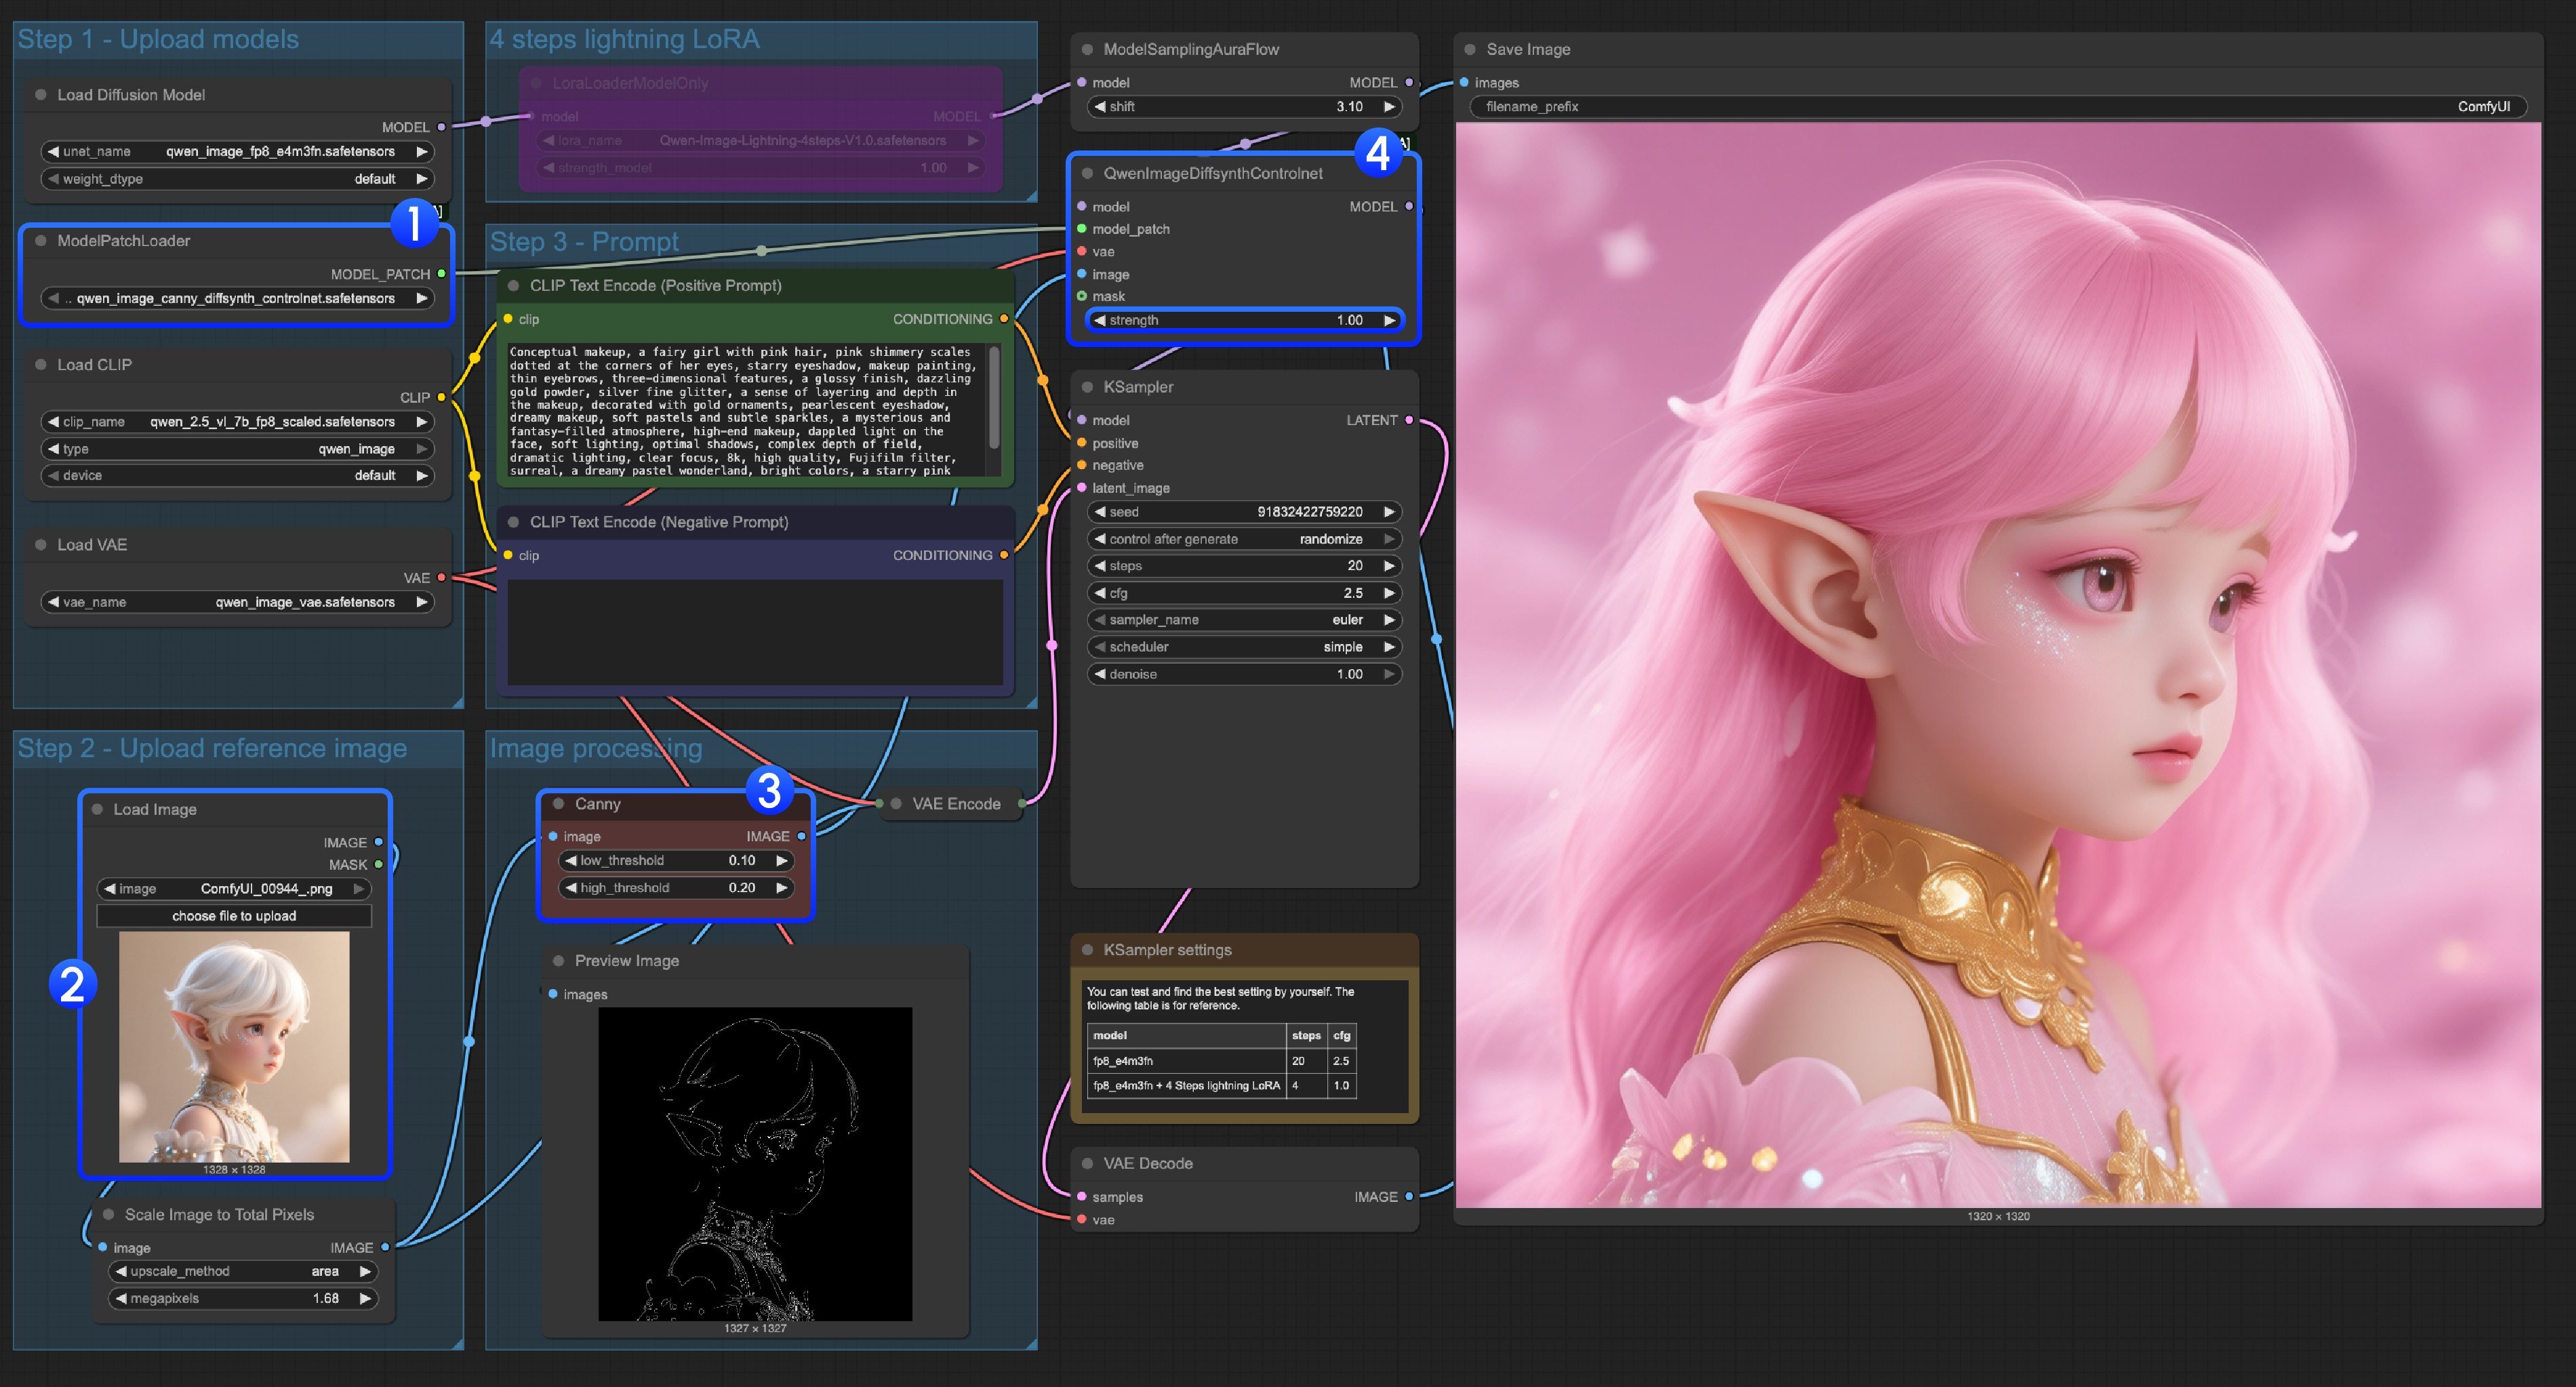
<img src="https://mintcdn.com/dripart-chore-sync-comfy-api-v2-spec-12fd5b4/6Y113JXmzR1RM6A-/images/tutorial/image/qwen/image_qwen_image_controlnet_patch-canny.jpg?fit=max&auto=format&n=6Y113JXmzR1RM6A-&q=85&s=d917ba9738920bd97b0fe46f11b17ccf" alt="Canny 工作流" width="3800" height="2046" data-path="images/tutorial/image/qwen/image_qwen_image_controlnet_patch-canny.jpg" />

1. 确保对应 `qwen_image_canny_diffsynth_controlnet.safetensors` 已被加载
2. 上传输入图片，用于后续处理
3. Canny 节点是原生的预处理节点，它将按照你设置的参数，将输入图像进行预处理，控制生成
4. 如果需要可以修改 `QwenImageDiffsynthControlnet` 节点的 `strength` 强度来控制线稿控制的强度
5. 点击 `Run` 按钮，或者使用快捷键 `Ctrl(cmd) + Enter(回车)` 来运行工作流

> 对于 qwen\_image\_depth\_diffsynth\_controlnet.safetensors 使用，需要将图像预处理成 depth 深度图，替换掉 `image processing` 图，对于这部分的使用，请参考本篇文档中 InstantX 的处理方法，其它部分与 Canny 模型的使用类似

**Inpaint 模型 ControlNet 使用说明**
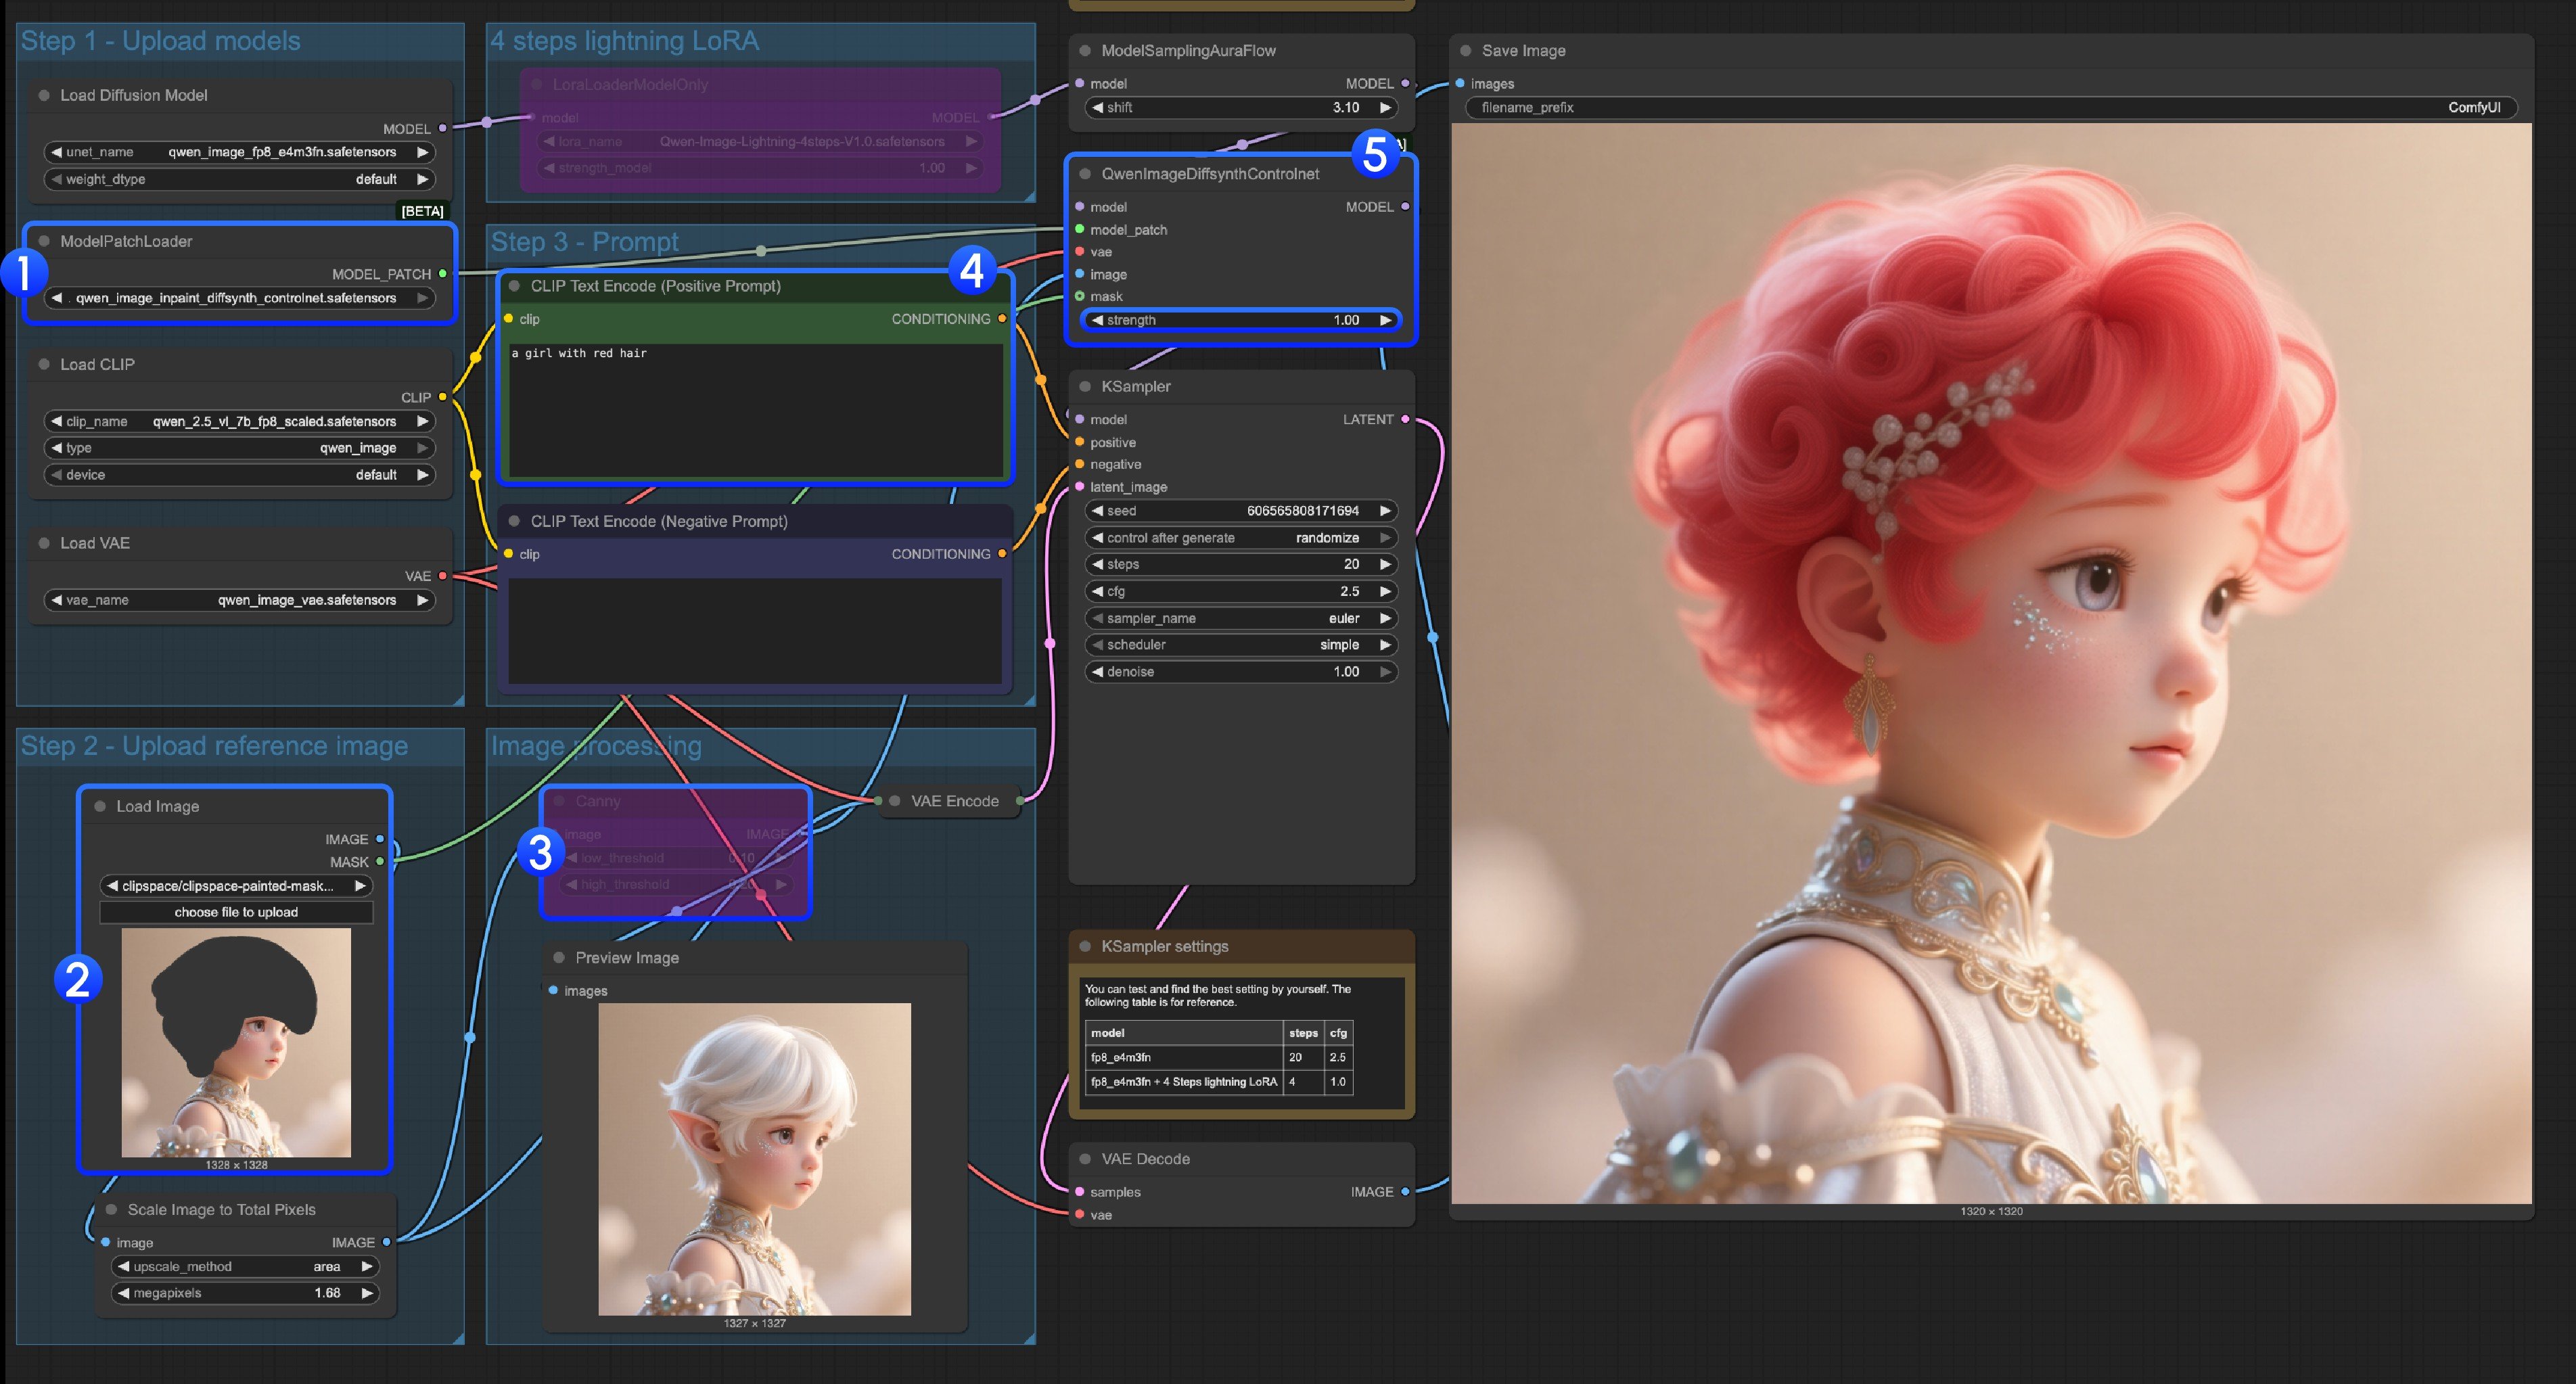
<img src="https://mintcdn.com/dripart-chore-sync-comfy-api-v2-spec-12fd5b4/6Y113JXmzR1RM6A-/images/tutorial/image/qwen/image_qwen_image_controlnet_patch-inpaint.jpg?fit=max&auto=format&n=6Y113JXmzR1RM6A-&q=85&s=cba3a8febd55abaae1711d28bd6759d9" alt="Inpaint 工作流" width="3808" height="2046" data-path="images/tutorial/image/qwen/image_qwen_image_controlnet_patch-inpaint.jpg" />

对于 Inpaint 模型，它需要使用 [蒙版编辑器](/zh/interface/maskeditor)，来绘制一个蒙版然后作为输入控制条件

1. 确保 `ModelPatchLoader` 加载的是 `qwen_image_inpaint_diffsynth_controlnet.safetensors` 模型
2. 上传图片，并使用[蒙版编辑器](/zh/interface/maskeditor) 绘制蒙版，你需要将对应 `Load Image`节点的 `mask` 输出连接到 `QwenImageDiffsynthControlnet` 的 `mask` 输入才能保证对应的蒙版被加载
3. 使用 `Ctrl-B` 快捷键，将原本工作流中的 Canny 设置为绕过模式，来使得对应的 Canny 节点处理不生效
4. 在 `CLIP Text Encoder`  输入你需要将蒙版部分修改成样式
5. 如需要可以修改 `QwenImageDiffsynthControlnet` 节点的 `strength` 强度来控制对应的控制强度
6. 点击 `Run` 按钮，或者使用快捷键 `Ctrl(cmd) + Enter(回车)` 来运行工作流

## Qwen Image Union ControlNet LoRA 工作流

<h3 id="image_qwen_image_union_control_lora">
  Qwen-Image Union Control
</h3>

使用 Qwen-Image 的统一 ControlNet LoRA 生成具有精确结构控制的图像。支持多种控制类型，包括 canny、depth、线稿、softedge、法线和 openpose。

<img src="https://raw.githubusercontent.com/Comfy-Org/workflow_templates/main/templates/image_qwen_image_union_control_lora-1.webp" alt="Qwen-Image Union Control 工作流预览" />

<CardGroup cols={2}>
  <Card title="在 Comfy Cloud 上运行" icon="cloud" href="https://cloud.comfy.org/?template=image_qwen_image_union_control_lora&utm_source=docs&utm_medium=referral&utm_campaign=qwen-image">
    在 Comfy Cloud 中打开
  </Card>

  <Card title="下载工作流" icon="download" href="https://github.com/Comfy-Org/workflow_templates/blob/main/templates/image_qwen_image_union_control_lora.json">
    下载 JSON，或在模板库中搜索 "Qwen-Image Union Control"
  </Card>
</CardGroup>

**输入材料**

将此文件上传到对应的 `LoadImage` 节点：

<CardGroup cols={2}>
  <Card title="image_qwen_image_union_control_lora_input_image.png" icon="image" href="https://raw.githubusercontent.com/Comfy-Org/workflow_templates/main/input/image_qwen_image_union_control_lora_input_image.png">
    `LoadImage` 节点 73 · `image_qwen_image_union_control_lora_input_image.png`
  </Card>
</CardGroup>

<div style={{display: 'grid', gridTemplateColumns: 'repeat(2, minmax(0, 1fr))', gap: '1rem', alignItems: 'start'}}>
  <img src="https://raw.githubusercontent.com/Comfy-Org/workflow_templates/main/input/image_qwen_image_union_control_lora_input_image.png" alt="image_qwen_image_union_control_lora_input_image.png" style={{width: '100%', height: 'auto', objectFit: 'contain'}} />
</div>

**示例输出**

<div style={{display: 'grid', gridTemplateColumns: 'repeat(2, minmax(0, 1fr))', gap: '1rem', alignItems: 'start'}}>
  <img src="https://raw.githubusercontent.com/Comfy-Org/workflow_templates/main/input/image_qwen_image_union_control_lora_input_image.png" alt="输入图像" style={{width: '100%', height: 'auto', objectFit: 'contain'}} />

  <img src="https://raw.githubusercontent.com/Comfy-Org/workflow_templates/main/output/image_qwen_image_union_control_lora.png" alt="Qwen-Image Union Control 示例输出" style={{width: '100%', height: 'auto', objectFit: 'contain'}} />
</div>

原始模型地址：[DiffSynth-Studio/Qwen-Image-In-Context-Control-Union](https://www.modelscope.cn/models/DiffSynth-Studio/Qwen-Image-In-Context-Control-Union/)
Comfy Org 重新托管地址：[qwen\_image\_union\_diffsynth\_lora.safetensors](https://huggingface.co/Comfy-Org/Qwen-Image-DiffSynth-ControlNets/blob/main/split_files/loras/qwen_image_union_diffsynth_lora.safetensors)：支持 canny、depth、pose、线稿、softedge、法线、openpose 的图像结构控制 LoRA

### 1. 工作流及输入图像

更新 ComfyUI 之后，你可以从模板中找到工作流文件，或者将上方的工作流预览拖入 ComfyUI 中进行加载。

### 2. 模型链接

下载下面的模型。由于这是一个 LoRA 模型，需要保存到 `ComfyUI/models/loras/` 文件夹下

* [qwen\_image\_union\_diffsynth\_lora.safetensors](https://huggingface.co/Comfy-Org/Qwen-Image-DiffSynth-ControlNets/blob/main/split_files/loras/qwen_image_union_diffsynth_lora.safetensors)：支持 canny、depth、pose、线稿、softedge、法线、openpose 的图像结构控制 LoRA

### 3. 工作流说明

这个模型是一个统一控制 LoRA，支持 canny、depth、pose、线稿、softedge、法线、openpose 控制。由于许多图像预处理原生节点并未完全支持，你应该使用类似 [comfyui\_controlnet\_aux](https://github.com/Fannovel16/comfyui_controlnet_aux) 的工具来完成其他图像预处理。

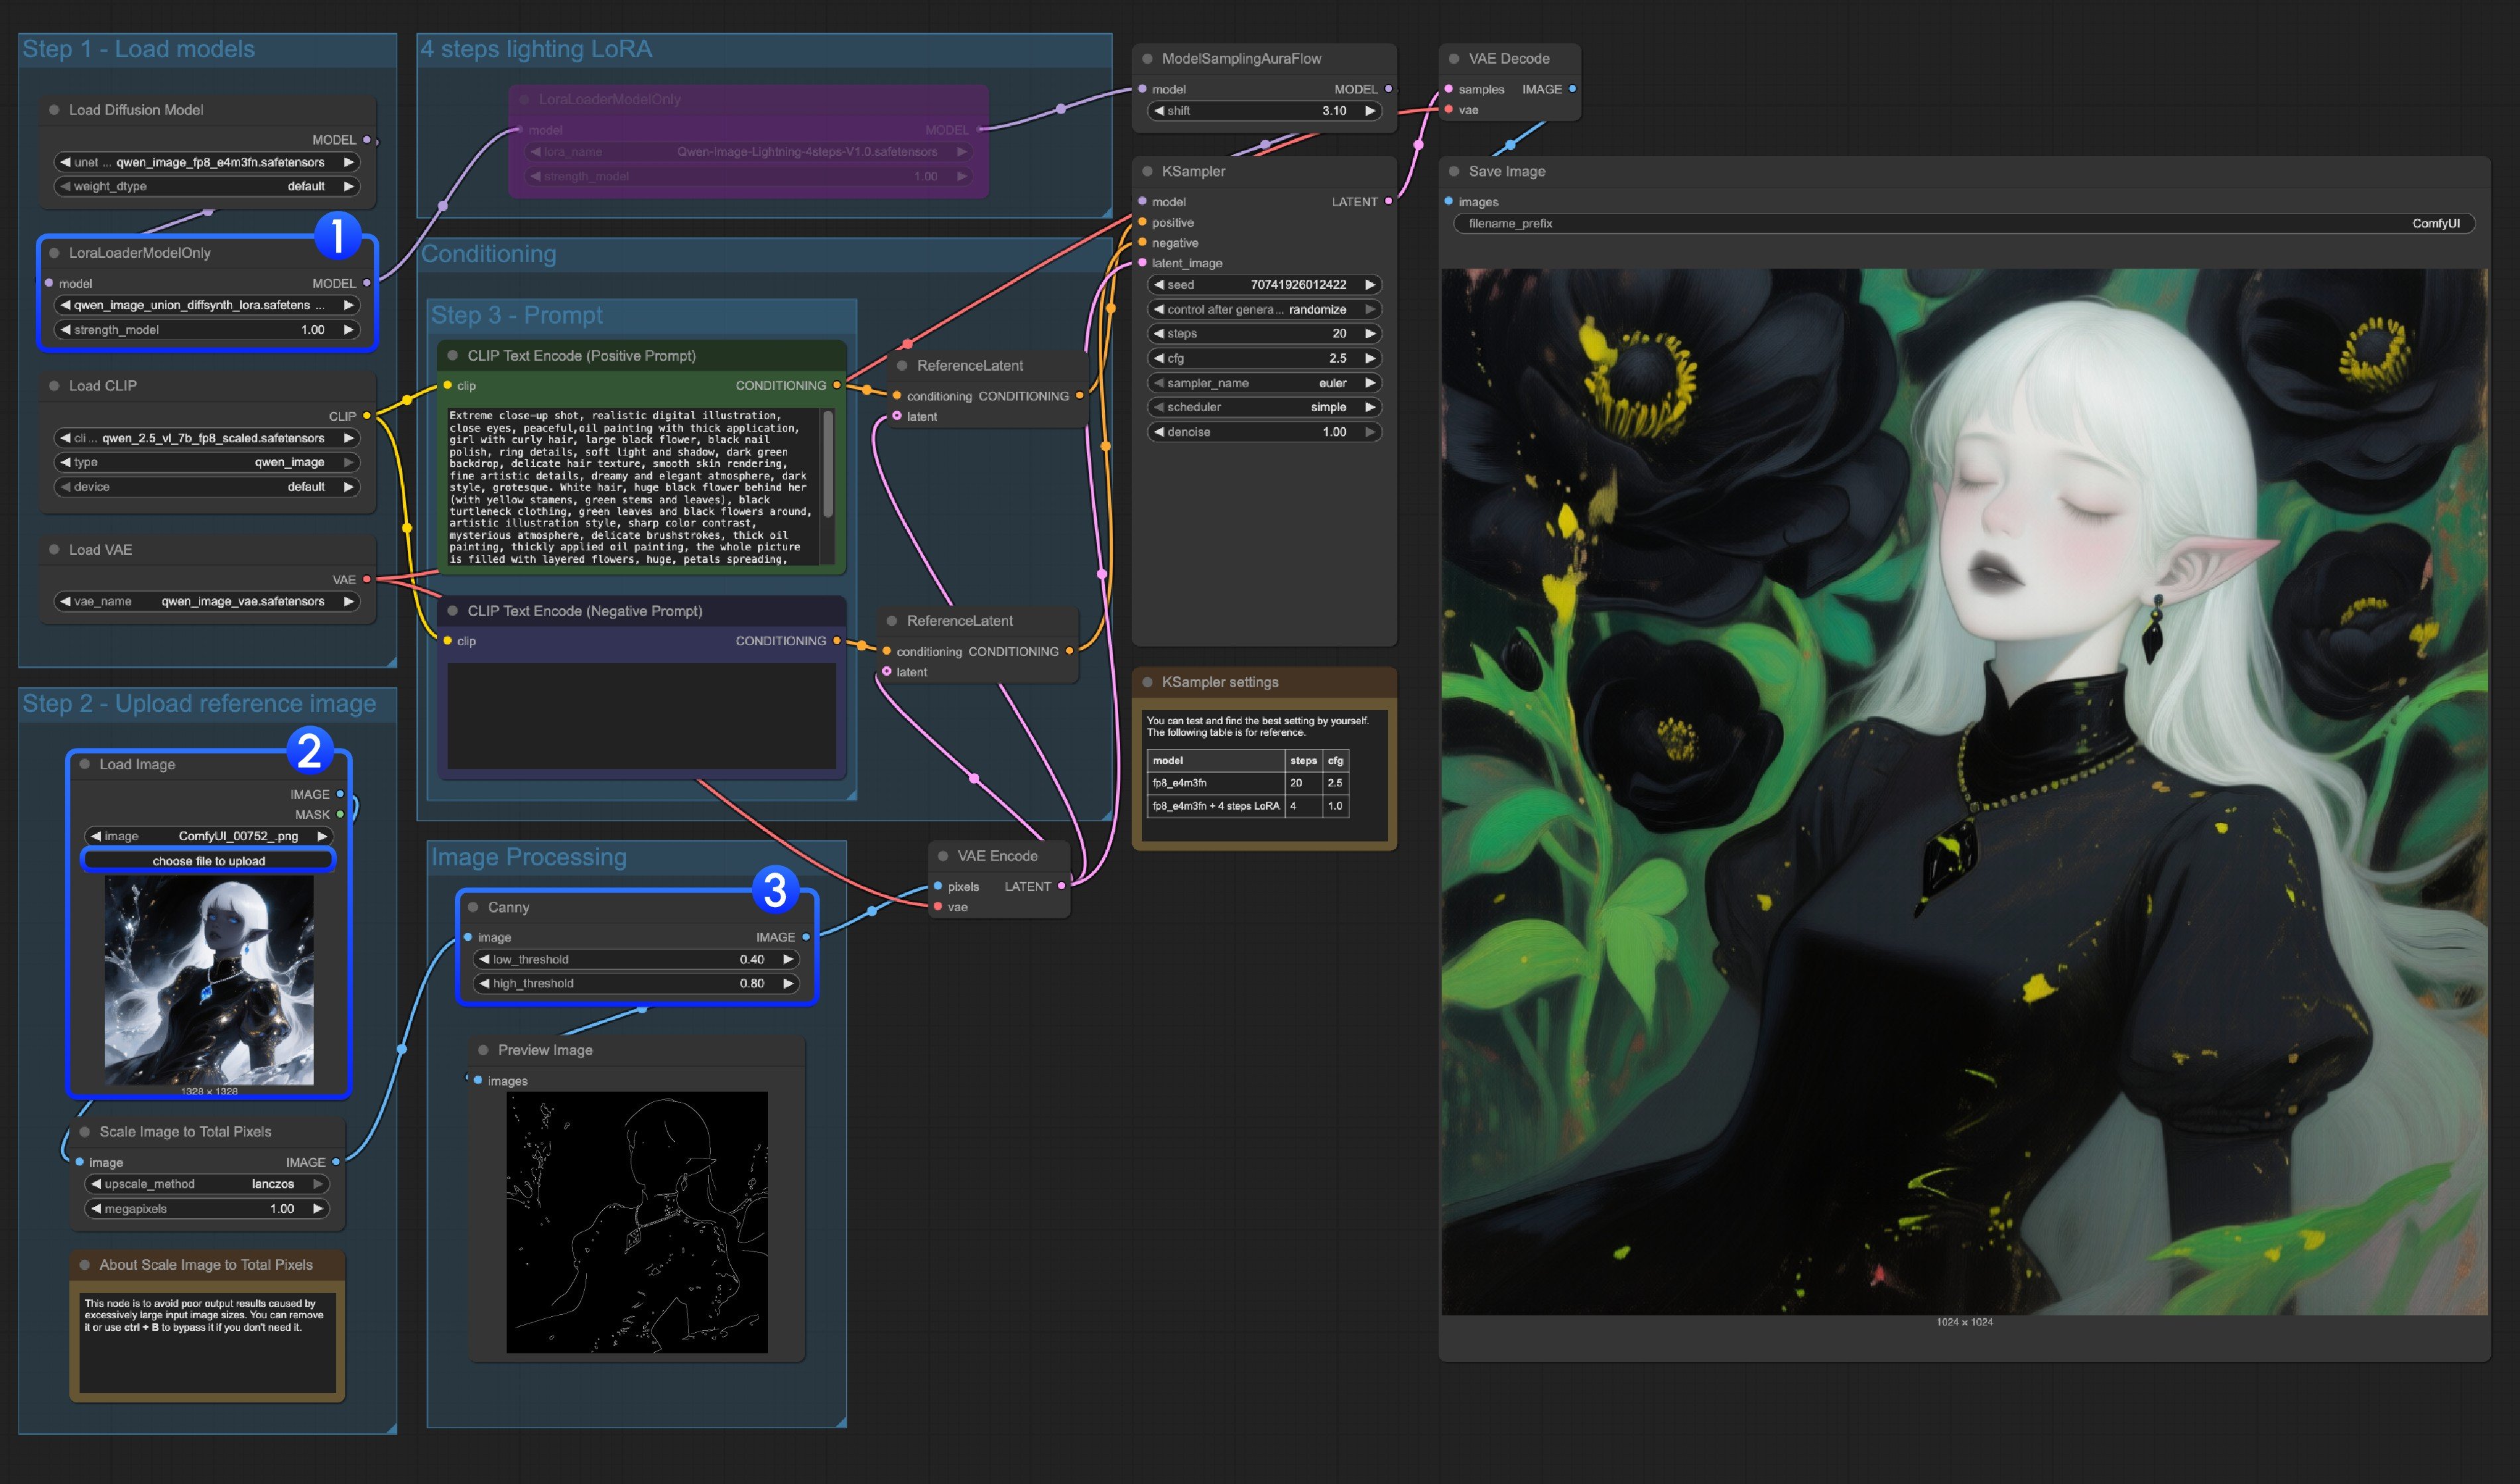
<img src="https://mintcdn.com/dripart-chore-sync-comfy-api-v2-spec-12fd5b4/6Y113JXmzR1RM6A-/images/tutorial/image/qwen/image_qwen_image_union_control_lora.jpg?fit=max&auto=format&n=6Y113JXmzR1RM6A-&q=85&s=305f22867e22803cc5a816fc3f2db6d9" alt="Union Control LoRA" width="3800" height="2238" data-path="images/tutorial/image/qwen/image_qwen_image_union_control_lora.jpg" />

1. 确保 `LoraLoaderModelOnly` 正确加载 `qwen_image_union_diffsynth_lora.safetensors` 模型
2. 上传输入图像
3. 如有需要，你可以调整 `Canny` 节点的参数。由于不同的输入图像需要不同的参数设置才能获得更好的图像预处理结果，你可以尝试调整相应的参数值，以获得更多/更少的细节
4. 点击 `Run` 按钮，或使用快捷键 `Ctrl(cmd) + Enter` 运行工作流

> 对于其他类型的控制，你还需要替换图像处理部分。